This is the first part in a series on How to Queen Walk. This guide provides an introduction to what the Queen Walk is and covers the basics.
What is a Queen Walk?
A Queen Walk is a tactic of using the Archer Queen with a number of Healers to allow her to move around the enemy village whilst having any incoming damage she receives healed. This tactic is most viable with the Archer Queen due to her having a ranged attack (unlike the Barbarian King) and a high damage output (unlike the Grand Warden) allowing her to shoot over walls.

Either 4 or 5 healers can be used for a Queen Walk, although at TH10 and above it is best to use 5 due to the greater risk of Seeking Air Mines taking out a healer or two. Rage Spells can also be used to boost both the healing amount of the Healers and increase the damage output from the Archer Queen for brief periods when required.
This tactic is best with a mid to high level Archer Queen. A lower level Archer Queen lacks the HP to buffer tank when there is peak incoming damage and lacks the DPS quickly take out defending Clan Castle troops and defences. At TH9 this is viable with an Archer Queen from around level 10 upwards.
When to use a Queen Walk
The Queen Walk is commonly used at the start of an attack to take out strategic targets before the main army troops are deployed. At TH11 and above, this can be ideal for destroying a portion of the base without activating the Eagle Artillery.
Luring and destroying defending Clan Castle troops is often the most valuable objective as this will help protect the rest of your army troops. If you are using an air based attack, the Queen Walk can be used to destroy Air Defences, especially on base designs where they are offset to one side and take out the defending Queen.
The priority of targets will generally depend on your main army strategy to ensure you get maximum value prior to deployment of those troops.
The Queen Walk can be an alternative to using a kill squad, however if the Queen is able to survive her initial push she can provide far greater value, sometimes taking out as much as 50% of the village during the attack.
Range of the Archer Queen’s attack
The Archer Queen has a range of 5 tiles. This allows her to shoot over a wall and attack 2 rows of structures assuming there is no space left between the rows. The following examples show which structures the queen would be able to attack:
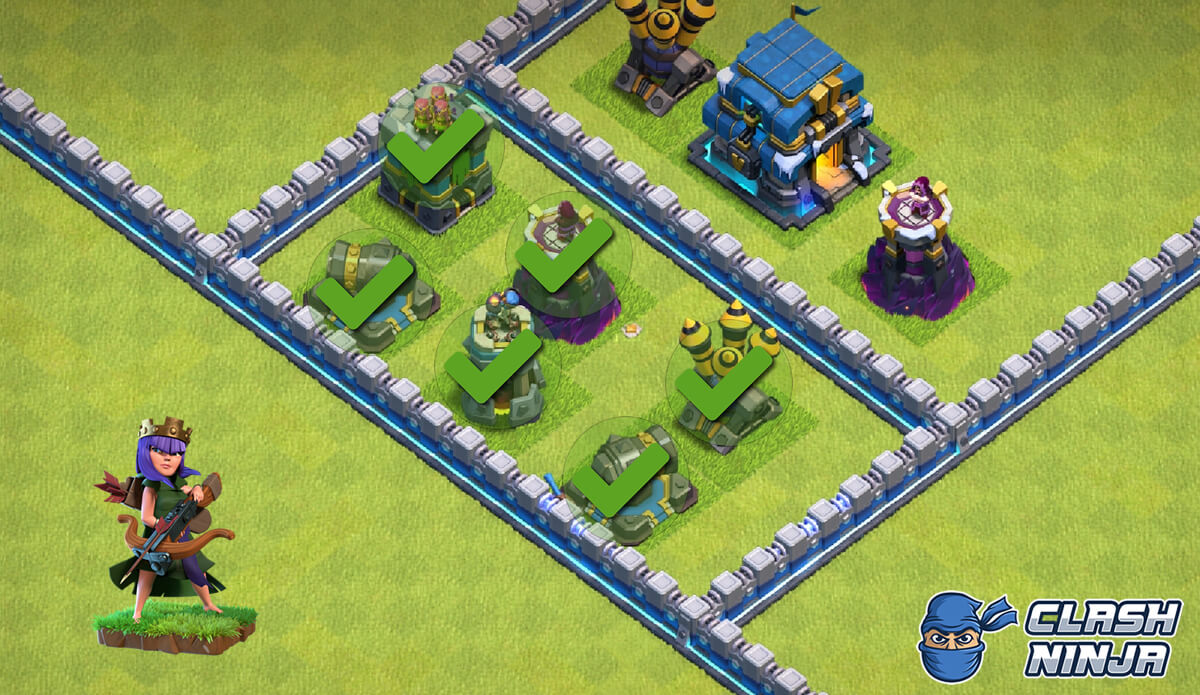 All the structures behind the wall are within range
 The near row of structures are within range, however the back row isn't due to the 1 tile gap
 Although there is no space between the Army Camp and Archer Tower, the larger size of the Army Camp puts it out of the Queen's range
 The Archer Tower is out of range from the front of the base, however due to the next wall length being set in 1 tile, it will be in range of the Queen as she moves left
 Even with the two rows of walls, all of the front row except the Mortar are within range
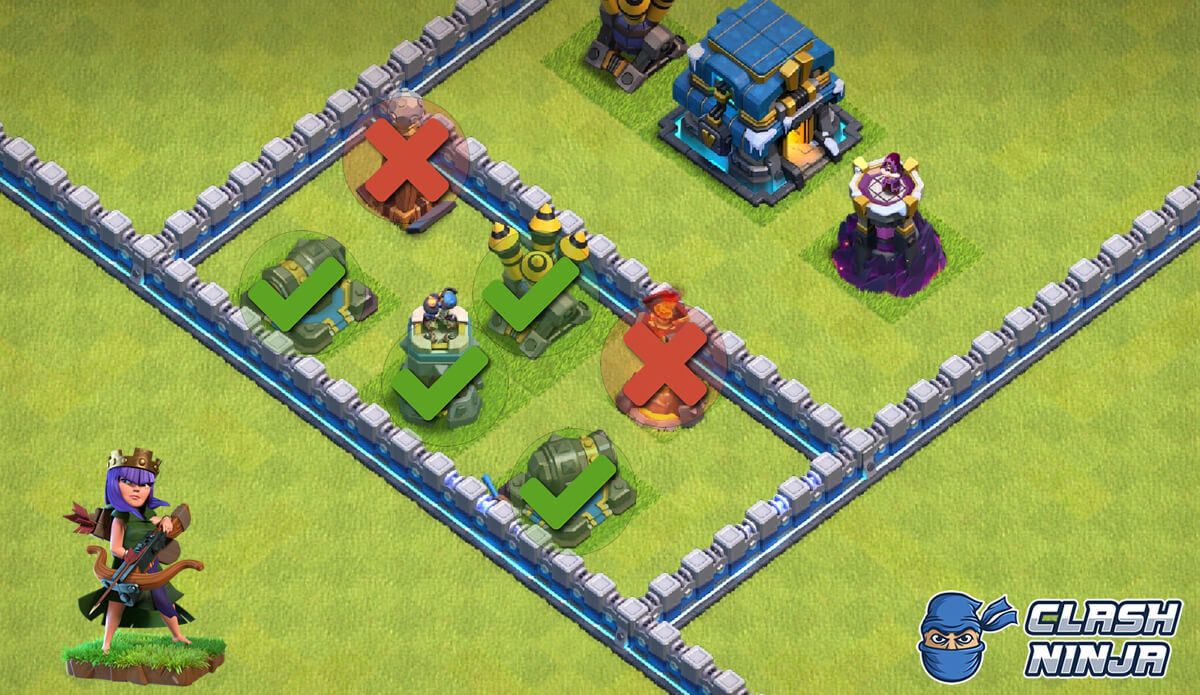 Due to the smaller size of the Inferno Tower and Hidden Tesla, they are out of range of the Queen
Using Rage Spells
What does the Rage Spell do?
A Rage Spell increases the speed and damage of troops within its area of coverage. In the case of a Queen Walk, it will increase the healing amount of the Healers, increase the Archer Queen’s damage output as well as increasing their movement speed.
When to use a Rage Spell
A Rage Spell can help the Queen survive during times where the incoming damage is greater than the healing capacity of the Healers as well as boosting her damage output to help her destroy the source of damage.
Determining the best points of your attack will often come down to experience, however there are some common points when using a Rage Spell is necessary:
- When engaging the defending Archer Queen or Barbarian King. This will depend on the level difference between your Archer Queen and the defending hero and other incoming damage.
- When engaging the defending defending Clan Castle Troops that have a high damage output (this is covered in more details in Part 3: Defending Clan Castle Troops)
- When the Queen is being engaged by multiple high damage structures, such as high level X-Bows, Cannons, Archer Towers or defending Grand Warden
After using the Queen Walk for an extended period, you will start to learn what her capabilities are and know which scenarios will require use of a Rage Spell. During this time you should also be upgrading her which will help her performance further.
Rage Spell Placement
Rage Spell placement is vital to ensure it is effective. The criteria for valuable placement is as follows:
- Ensure the Rage Spell includes the Healers.
- Try to include the Archer Queen to increase her damage output and movement speed.
- Place the spell to cover the path the Archer Queen will take next. Possible the most difficult to achieve but can increase the duration the Healers and Queen spend within the spell area.
During your early Queen Walks, focus on point 1 as failing to do this will likely result in the Queen not surviving. Once you have perfected Healer coverage, work on trying to include points 2 and 3.
Additional Value
If you need to use Wall Breakers to help maneuver your queen to the key strategic targets, deploying them whilst you are using a Rage Spell during your Queen Walk and help ensure their success at destroying the walls due to the damage increase. Keep in mind that traps and defences will still be able to damage them, so only deploy them if there is suitable tanking/protection in place.
When to use the Queen’s Royal Cloak ability
The Royal Cloak ability is the Queen’s ‘get out of jail free’ card. Activating it will cause any defences targeting her to lose focus and target other troops, such as the Archers that she spawns. Ideally you should try and save her ability for later on in the attack when she is deeper in the village and use a Rage Spell before then.
Common scenarios can include:
- Single Target Inferno Tower targeting the Queen and she won’t be able to destroy it before it reaches flame stage 3.
- High damage defending Clan Castle troops that won’t be destroyed before they reach the queen.
- High level of incoming damage that even a Rage Spell cannot mitigate.
Once the ability has been activated, the Queen will have a few seconds for the Healers to help recover her health before she if vulnerable to the defences again.
Keep in mind that although the Queen cannot be targeted during her ability, she can still take damage from area of effect traps and defences which could knock her out. It is possible that the Archers she spawns can trigger a nearby Giant Bomb which depending on her HP at that point, could be enough to overcome her.
Tips to help ensure success
Plan the route you want to take through the village. The Queen will generally move towards the nearest structure, although sometime there are some quirks to her pathing. It is best to help push her in the direction you want her to move by using funneling troops such as Baby Dragons or Wizards. You can deploy them to take out structures that should direct her to where you want her to go. This is one of the most difficult aspects of a successful Queen Walk, however test it out on practice attacks and watch replays back where things didn’t work out how you planned to learn from it.
Have a ‘Plan B’ strategy in case something doesn’t quite work out how you expected. What will you do if your Queen walks the wrong way? What will you do if she is knocked out before completing an objective? If you know ahead of time what you will do, you’ll save valuable seconds if it does go wrong.
Keep an eye on the clock showing the remaining time when you attack. If you take too long with the Queen Walk portion of your attack, you may miss out on the 3 stars due to running out of time. Generally, you want to be deploying your main army within around 1 minute of the attack starting (when the clock displays 2:00 remaining). If you are seconds away from luring the defending Clan Castle troops or taking out a strategic target, waiting a few seconds more may be worthwhile but usually you will need to push in with your main army.
If there are known air traps near to where the healers will pass, use a Balloon to activate and detonate the traps. This will help prevent losing a Healer and Balloons are 5 troop space vs 14 troop space.
Unless you are deploying your Queen in a position where she will immediately take a large amount of damage, deploy healers in a staggered manner (wait up to a second between dropping each Healer and slightly fan them out). This can be good to do on fresh hits where you are unsure of where air traps are. The first healer deployed can trigger multiple air traps and result in your remaining healers being able to be deployed unscathed.
Most importantly of all, practice makes perfect. Reading about how to perform the perfect Queen Walk will only help you so much, nothing beats experience. Use a Queen Walk when farming and practice navigating her around the village you are attacking to get an understanding of how she paths. Take a few funneling troops such as Baby Dragons with you and practice using them to direct her where you would like her to go. Start off attacking weaker villages and as you become more comfortable, attack stronger ones. A Queen Walk can be very effective for looting Dark Elixir as you can direct the Queen towards the storage.
Don’t be afraid of failure, sometimes it goes wrong for even the most experienced players. If it goes wrong, watch the replay and try and identify what you could have done differently. You can take something positive from a failure if you learn something from it to help you succeed in future attacks.
Next Part
Part 2 of the guide explores the main threats to the success of a Queen Walk.